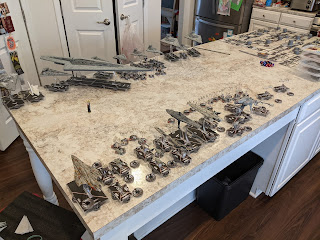
Battle of Endor - Recreation
In deploying 30+ models, we elected to deploy friendly, rather than taking turns. The official objective was:
- Imperials do not lose if all Rebel fighters were destroyed
- Rebels do not lose if the SSD is destroyed.
The SSD took the center of the formation, with two interdoctors flanking it. The four ISDs were placed with two on each wing of the Imperial formation, expecting them to quickly move to corral the Rebel forces. Near to the SSD, the Imperials deployed their carriers and fighters.
The Rebels deployed Home One and an MC75 in the center. Gallant Haven would follow. The two MC30s would move quickly around the Mon Calamari formation to strike the SSD's flank. Outside of them, Yavaris and a bomber transport would provide support. Liberty with two ramming CR90s would oppose Chimera and its ISD division mate. The remaining corvettes and frigates would counter the fighters and meet the SSD head on.
In the first round, the Imperial fighters and most of the Rebel fighters started their furball, with significant Rebel losses, including Tycho Chelu. The ships were moving into position, without any exchange of fire.
In the second round, many more squadrons were shot down, such as Wedge Antilles and Han Solo. The Imperial carriers moved ahead of the SSD to support, but were also lost as the Rebel corvettes and frigates outnumbered their position. Liberty and Chimera began exchanging fire, and the Rebel slicer tool transport and one ramming corvette was destroyed. The SSD also began pounding Home One as it lead the Rebel capital ships. Flanking forces continued to move into their positions.
The third round began with difficult decisions. Of the damaged ships and squadrons, what is most pivotal to activate first. The Rebels began with their fight against Chimera, while the Imperials targeted the Rebel fighters (remember the objective). Shara Bey, the rest of the A-wings, and most of the X-wings were lost. However, Yavaris activated Norra Wexley and two escorting Y-wings to take down the damaged ISD and then the bomber transport sent more Y-wings at Chimera, which Liberty finished. The SSD pounded Home One and the MC75, damaging both, but they were still alive. The lead MC30 "double-arc'd" the SSD with both its sides and Ackbar ordered full salvos (2 red, 2 blue, 4 black with TRC and ordinance rerolls). The interdoctors continued to scramble shots and restore shields, but were falling behind. Jyn Erso sabotaged the SSD with support from Captain Rex to lock down everything on the command ship.
In the fourth round, the SSD finished off Home One, reducing the Rebel salvos, but would be lost from the remaining Rebel capital ships. The VSDs and ISDs were finally in position to hammer the corvettes and frigates. We ended our recreation of the Battle of Endor at this point with a clear Rebel victory. The Imperials would inflict significant losses on the Rebels, but Norra's Y-wings would survive to win.


Comments
Post a Comment